

A Beginner’s Guide to Choosing the Right Kit Solar Panel for Your DIY Energy Project
With energy bills rising and climate change concerns growing, many UK homeowners are turning to solar energy as a smart, sustainable solution.
If you’re considering a DIY approach, a kit solar panel is a fantastic way to get started.
But with so many options available, how do you pick the right one for your project?
At Energex Eco Limited, we understand that choosing the perfect solar kit can feel overwhelming, especially if you’re new to renewable energy.
This guide will walk you through everything you need to know—from understanding what’s in a kit, to sizing your system, to installation tips—so you can confidently select the right solar panel kit for your DIY energy project.
Why Choose a Kit Solar Panel for Your DIY Project?
A kit solar panel is a complete package that contains all the essential components you need to set up a solar energy system.
These kits are designed to simplify the process, making solar power accessible even if you don’t have a technical background.
Instead of buying individual parts and figuring out compatibility, a kit bundles everything together, saving you time and potential headaches.
Advantages of DIY solar panel kits include:
- Cost savings: By installing the system yourself, you avoid hefty labour fees.
- Ease of installation: Kits come with clear instructions and all necessary hardware.
- Energy independence: Generate your own electricity and reduce reliance on the grid.
- Environmental benefits: Reduce your carbon footprint by using clean, renewable energy.
- Scalability: Kits come in various sizes to suit small projects or full home systems.
For many UK households, a DIY solar kit is a practical and rewarding way to start producing green energy.
What’s Included in a Solar Panel Kit?
Before you buy, it’s important to understand what you’re getting. Most solar panel kits include:
- Solar panels: These are the heart of the system, converting sunlight into electricity.
- Mounting hardware: Brackets and rails to securely attach panels to your roof or ground.
- Charge controller: Regulates the voltage and current from the panels to batteries (if included), preventing overcharging.
- Inverter: Converts the direct current (DC) electricity generated by panels into alternating current (AC) used by household appliances.
- Cables and connectors: All wiring needed to connect components safely.
- Battery storage (optional): Stores excess energy for use when the sun isn’t shining.
Some kits also include monitoring systems so you can track your energy production and usage in real time.
Types of Solar Panel Kits Available
Solar kits come in several varieties, each suited to different needs and budgets. Here’s a quick overview:
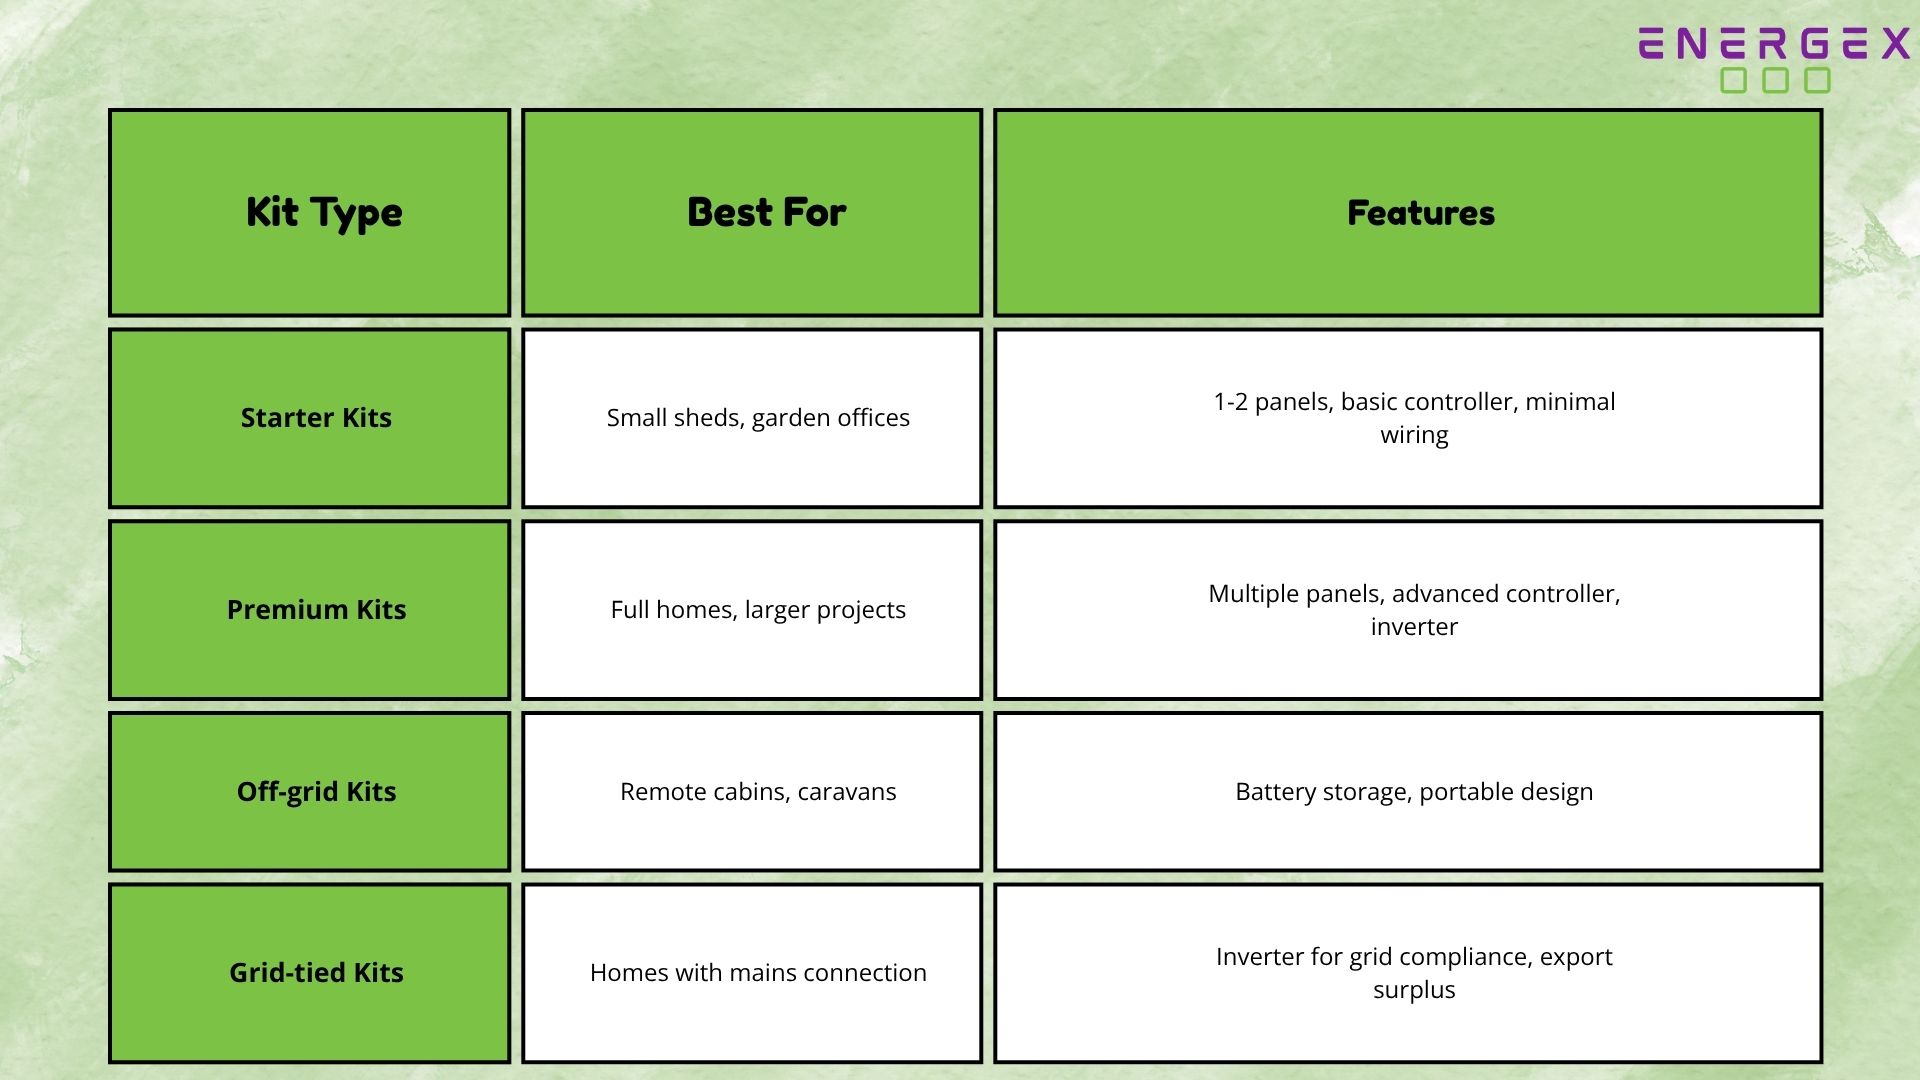
For example, if you want to power a garden office or small outbuilding, a starter kit with 1 or 2 panels might be enough.
But for a full home installation, you’ll want a premium or grid-tied kit with more panels and an inverter that meets UK grid regulations.
How to Choose the Right Kit Solar Panel for Your Project
1. Calculate Your Energy Needs
The first step is to understand how much electricity you use or want to generate.
Look at your electricity bills to find your average daily consumption in kilowatt-hours (kWh).
If you’re powering a small outbuilding, list the appliances you want to run and estimate their usage.
There are online calculators that can help you estimate your needs based on appliances and usage patterns.
This will guide you in selecting a kit with the right capacity.
2. Assess Your Installation Site
- Roof or ground? Most UK homes install panels on south-facing roofs for maximum sunlight. If you don’t have suitable roof space, ground-mounted panels are an option.
- Sunlight exposure: Avoid shaded areas from trees, chimneys, or nearby buildings.
- Available space: Panels need room to be installed safely and efficiently.
3. Decide on System Size
Solar panels come in different wattages, typically between 250W and 400W per panel.
Multiply the number of panels by their wattage to get your system size.
For example, 10 panels at 300W each give a 3kW system.
Choose a system size that meets or slightly exceeds your daily energy needs to account for cloudy days and future growth.
4. Battery Storage or Grid-Tied?
- Battery storage: Ideal if you want to store excess energy for use at night or during power cuts. Batteries add cost but increase independence.
- Grid-tied: Connects your system to the national grid, allowing you to export surplus energy and draw from the grid when needed.
In the UK, grid-tied systems are common and benefit from schemes like the Smart Export Guarantee (SEG), which pays you for excess power you send back to the grid.
5. Check Quality and Certification
Look for kits with certification such as the Microgeneration Certification Scheme (MCS), which ensures the equipment meets UK standards and qualifies for government incentives.
Choose reputable brands with good warranties—typically 10-25 years for panels and 5-10 years for inverters.
DIY Installation: What to Expect
Many solar panel kits come with step-by-step instructions, making installation manageable for confident DIYers.
Here’s a general overview of the process:
- Plan your layout: Mark where panels and mounts will go. Ensure they face south and are tilted at an angle between 30-40 degrees for optimal UK sunlight.
- Install mounting hardware: Secure brackets to roof rafters or ground frames, ensuring they’re sturdy and weatherproof.
- Attach the panels: Fix panels to the mounts carefully.
- Wire the system: Connect panels to the charge controller, inverter, and batteries if included.
- Connect to your home’s electrical system: For grid-tied systems, a qualified electrician must complete the final connection to ensure safety and compliance.
Safety tip: Always wear protective gear and follow manufacturer instructions.
If you’re unsure about electrical work, hire a professional.
Common Mistakes to Avoid
- Underestimating your energy needs: This can lead to insufficient power generation.
- Ignoring local planning rules: Some areas require planning permission, especially for ground-mounted systems or listed buildings.
- Choosing cheap, low-quality kits: These may fail prematurely and cost more in the long run.
- Poor site assessment: Shading or incorrect panel orientation reduces efficiency.
- DIY electrical work without expertise: This can be dangerous and may invalidate warranties or insurance.
FAQs
Q.1 What is included in a solar panel kit?
A typical kit includes solar panels, mounting hardware, a charge controller, inverter, wiring, and sometimes batteries for storage.
Q.2 Do I need planning permission for solar panels in the UK?
Most domestic installations don’t require planning permission, but check with your local council if you live in a listed building, conservation area, or plan a large ground-mounted array.
Q.3 Can I install solar panels myself?
Yes, many kits are designed for DIY installation, but electrical connections to your home should be handled by a qualified electrician for safety and compliance.
Q.4 How long do solar panel kits last?
Most quality panels last 25 years or more, and reputable kits come with warranties of 10-25 years.
Q.5 How much does a solar panel kit cost in the UK?
Prices range from £200 for small kits to over £10,000 for large, whole-home systems.
Most home kits cost between £1,000 and £5,000 depending on size and features.
Conclusion
Choosing the right kit solar panel for your DIY energy project is an exciting step toward energy independence and sustainability.
By understanding your energy needs, assessing your installation site, and selecting a quality kit designed for your requirements, you can confidently embark on your solar journey.
At Energex Eco Limited, we’re proud to support UK homeowners with expert advice and top-quality solar kits tailored to your needs.
Posted on Jul 07, 2025.
Back to News